Introduction: Upgrading Your 2026 Honda Pilot with LED Headlights
Your 2011 Honda Pilot has been a reliable companion for over a decade, tackling family trips and daily commutes with steadfast capability. Yet, as automotive technology has advanced, one area where this generation of Pilot often shows its age is in its factory headlight performance. The dim, yellowish glow of aging halogen bulbs can compromise nighttime visibility and safety. Upgrading to modern LED headlights is one of the most impactful and cost-effective modifications you can make, transforming your driving experience after dark. This comprehensive guide is designed to walk you through every aspect of this upgrade—from understanding your vehicle’s existing system to selecting the perfect bulbs and installing them with confidence. By embracing this modern lighting solution, you’re not just replacing a bulb; you’re significantly enhancing the safety, aesthetics, and functionality of your trusted SUV.
Understanding Your 2011 Honda Pilot’s Factory Headlight System
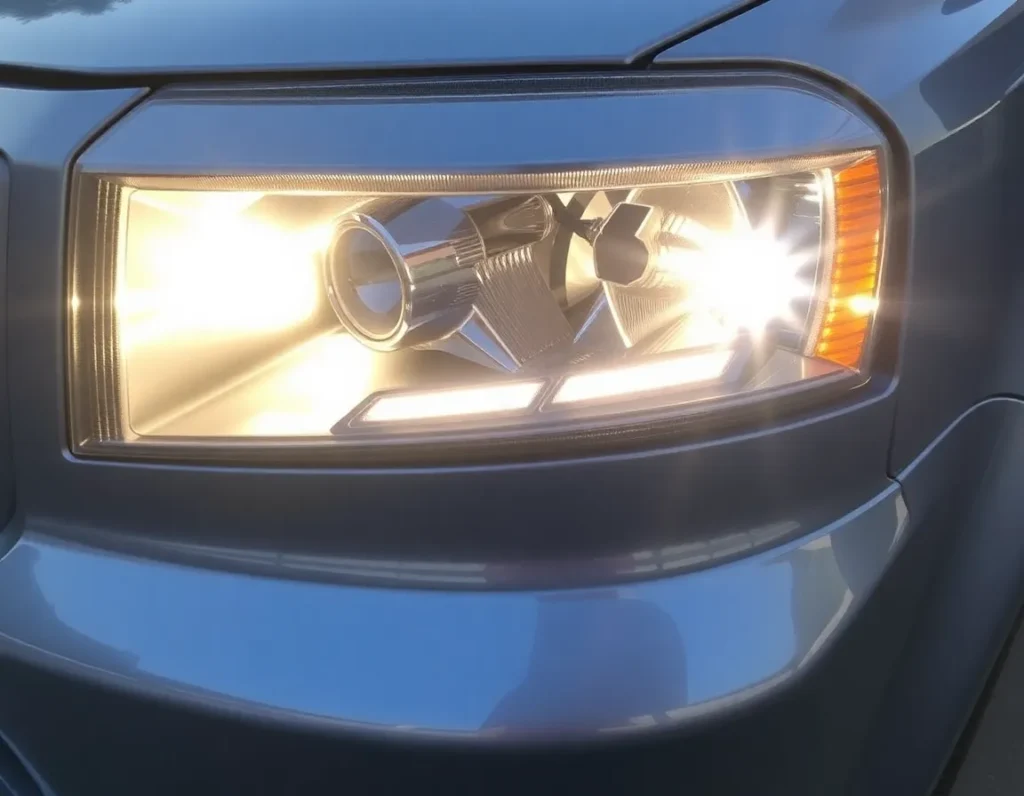
Before diving into an LED upgrade, it’s crucial to understand the system you’re modifying. The 2011 Honda Pilot uses a traditional halogen reflector headlight housing for both its low and high beams. Unlike modern projector-style housings, which use a lens to focus a sharp beam pattern, reflector housings use a mirrored bowl behind the bulb to direct light onto the road. This design is optimized for the specific filament placement and light emission pattern of halogen bulbs.
Your Pilot uses two separate bulbs for its primary headlight functions: a 9006 (HB4) bulb for the low beams and a 9005 (HB3) bulb for the high beams. These are single-filament bulbs, meaning each serves one dedicated function. The factory system is a plug-and-play, 12-volt DC system, drawing power directly from the vehicle’s battery and alternator. It’s a simple, robust design, but it has inherent limitations. Halogen bulbs produce light by heating a tungsten filament until it glows, a process that wastes a significant amount of energy as heat and results in a warmer color temperature (typically around 3000K), which appears yellowish. Over time, the filament degrades and the bulb’s output diminishes, leading to progressively poorer illumination.
Recognizing this baseline is key because an LED bulb must be carefully chosen to work within this existing reflector housing. The goal of a successful upgrade is to find LED bulbs that mimic the halogen filament’s light source location (the “filament point”) to ensure the reflector bowl projects light correctly, without creating dangerous glare for oncoming traffic or dark spots in your field of view.
The Advantages of LED Headlights for the 2011 Honda Pilot
Swapping out your dated halogens for 2011 Honda Pilot LED headlights offers a suite of benefits that directly address the shortcomings of the original equipment. The most immediate and noticeable improvement is in light output and quality. LEDs produce a much brighter, whiter light, typically in the 5000K to 6000K color temperature range, which is closer to natural daylight. This spectrum improves contrast, making it easier for your eyes to distinguish objects, road markings, and potential hazards at night, thereby reducing driver fatigue.
Beyond sheer brightness, LEDs are vastly more energy-efficient. They consume roughly 50-80% less power than equivalent halogen bulbs. For your Pilot, this means less strain on the electrical system and a negligible impact on fuel economy. This efficiency translates directly into longevity. Where a quality halogen bulb may last 500-1,000 hours, a well-designed LED headlight can provide 30,000 to 50,000 hours of service—effectively the lifetime of the vehicle for most drivers. You’ll save money and hassle on frequent bulb replacements.
Safety and reliability are also paramount. LEDs illuminate almost instantly, reaching full brightness in microseconds compared to the slight delay of halogens. This instant-on capability can be critical in fast-moving traffic situations. Furthermore, LEDs are solid-state devices with no fragile filament to break from vibration, making them exceptionally durable and well-suited for the bumps and jolts of everyday driving. Finally, the modern, crisp white light enhances the aesthetic appearance of your 2011 Pilot, giving it a more contemporary and upscale look.
Key Considerations Before Buying LED Headlights for Your Pilot
Not all LED conversion kits are created equal. Making an informed purchase is critical to achieving a safe, legal, and high-performing result. Here are the essential factors to evaluate:
- Bulb Size and Fitment: As established, your 2011 Pilot requires 9006 (HB4) for low beam and 9005 (HB3) for high beam. Ensure any kit explicitly lists these fitments.
- Canister Design and Cooling: LEDs generate heat at their base (the chip). Effective heat dissipation is the single biggest factor in LED longevity. Look for bulbs with large, finned aluminum heat sinks or, even better, silent fan-cooled systems. Passive cooling (just a heat sink) can be sufficient, but active cooling (a fan) is often more effective in the enclosed space of a headlight housing.
- Chip Technology and Lumens: Seek out bulbs using premium chips like Philips Lumileds, CREE, or Osram. Pay attention to lumens (a measure of total light output), not just wattage. A good LED should output at least 2,000+ lumens per bulb, significantly outperforming the ~1,000 lumens of a standard halogen.
- Beam Pattern Compatibility: This is the most critical aspect for safety and legality. The LED chips must be positioned to align with the focal point of the original halogen filament. Look for bulbs advertised as “CANbus ready” or “error-free,” which include built-in resistors or drivers to prevent hyper-flashing or dashboard warning lights. More importantly, choose bulbs specifically designed for reflector housings. Many manufacturers now offer “360-degree” or “top-and-bottom” LED chip placement to better mimic a halogen’s glow pattern.
- Kit Completeness: A good kit includes everything you need: the LED bulbs, drivers/ballasts, dust covers (or extensions if the new bulbs are longer), and all necessary wiring and connectors. Avoid kits that seem suspiciously cheap, as they often cut corners on thermal management and optical alignment.
A Step-by-Step Guide to Installing LED Headlights in a 2011 Honda Pilot
Replacing the headlight bulbs in your 2011 Pilot is a straightforward DIY project that requires no special tools. Always work on a cool, dry surface and handle the new LED bulbs by their base or heat sink, avoiding contact with the glass or LED chips to prevent oil contamination.
Tools and Preparation
You will need: your new LED headlight kit, a flat-head screwdriver, and a 10mm socket with ratchet. It’s helpful to have a towel or mat to kneel on and a flashlight. Begin by turning the vehicle off, setting the parking brake, and opening the hood. Locate the headlight assembly from behind the engine bay. You will see a large, round dust cover at the back of each headlight unit.
Accessing and Removing the Old Bulb
For the low beam (9006): Twist the dust cover counter-clockwise and remove it. You will see the wiring harness plugged into the back of the bulb. Disconnect this harness by pressing the small tab on the plug and pulling it straight back. Next, release the bulb retaining clip. This is a simple spring steel wire; squeeze the ends together and push it upward to release, then swing it out of the way. The halogen bulb can now be pulled straight out of the housing. For the high beam (9005), the process is identical, but the bulb is located in a separate, smaller compartment of the same headlight assembly, usually closer to the center of the vehicle.
Installing the New LED Bulb
Take your new LED bulb. Do not turn it on until it is fully installed. First, if your kit includes a separate driver or ballast, connect the bulb’s wiring to it. Insert the LED bulb into the headlight socket, ensuring it is seated correctly. The base of the LED bulb will often have tabs that align with slots in the socket, similar to the halogen. It is crucial that the LED chips are oriented correctly—typically, the chips should be positioned to shine “left and right” (at 3 and 9 o’clock) for a proper beam pattern in a reflector housing. Consult your kit’s instructions for the recommended orientation. Once seated, re-secure the retaining clip by swinging it back into place and ensuring it snaps securely over the bulb base.
Managing Wiring and Reassembly
This is the most important step for a clean installation. You must find a secure location to mount the LED driver/ballast. Use zip ties (often provided) to secure it to a stable bracket or frame piece near the headlight, ensuring it’s away from moving parts and extreme heat. Neatly route the wiring. If the new LED assembly is longer than the original bulb, you may need to use the provided dust cover extension or modify the stock dust cover (by cutting a small notch for the wires) to re-seal the headlight housing. A proper seal is vital to keep moisture and debris out. Finally, plug the vehicle’s wiring harness into the input on your LED driver. Repeat the entire process for the other side.
Final Testing and Alignment
Before closing the hood, turn on your vehicle’s headlights to test both low and high beams. Ensure they illuminate properly and that no error messages appear on the dash. It is highly recommended to check and adjust your headlight aim after installation. Park your Pilot on level ground facing a flat wall (like a garage door) about 25 feet away. The cutoff line of your low beams should be level and symmetrical. Adjustment screws are located on the top and side of the headlight housing; turn them slowly to raise or lower the beam. Proper aiming ensures maximum visibility without blinding other drivers, completing a safe and professional upgrade.
Troubleshooting Common LED Headlight Issues in the 2011 Pilot
Even with a careful installation, you might encounter some issues with your new 2011 Honda Pilot LED headlights. Knowing how to diagnose and fix common problems will save you time and frustration, ensuring your upgrade performs flawlessly.
Flickering or Strobing Lights
Flickering is one of the most frequent complaints. In the 2011 Pilot, this is almost always due to a mismatch between the vehicle’s electrical system and the LED bulbs. The Pilot uses a PWM (Pulse Width Modulation) signal to control power to the headlights, which can cause LEDs to flicker. The solution is a quality CANbus decoder or error eliminator. These devices smooth out the electrical signal. Ensure the decoder is properly connected between the vehicle’s harness and the LED driver. If flickering persists, try a different brand or model of decoder, as compatibility can vary.
Hyperflashing or Dashboard Error Messages
If your turn signals (if converted to LED) hyperflash or a “Check Headlight System” message appears, the vehicle’s computer detects lower power draw from the LEDs compared to the original halogens and interprets it as a burnt-out bulb. This is resolved with load resistors or, more effectively, CANbus-specific LED kits that include built-in error cancellation. For low/high beam headlights, a dedicated anti-flicker harness or decoder is required. Always purchase LEDs marketed as “CANbus ready” or “error-free” for the 2011 Pilot to minimize this issue.
Intermittent Operation or One Light Not Working
If one light cuts out or behaves erratically, first check the physical connections. Unplug and firmly re-seat the connections at the vehicle harness, the LED driver, and the bulb itself. Corrosion or moisture in the connectors can also cause this; ensure the dust cover is sealed properly. Next, swap the problematic LED assembly to the other side of the vehicle. If the problem follows the bulb, the LED unit or its driver is faulty. If the problem stays on the same side, the issue is with the vehicle’s wiring or socket on that side.
Poor Beam Pattern or Glare
A scattered, uneven, or glaring beam pattern typically stems from incorrect bulb positioning. LED bulbs have chips that must align precisely like the filament in a halogen bulb—usually at the 3 and 9 o’clock positions. If your kit includes adjustable collars or rotatable bases, experiment with their orientation until the beam cutoff is sharp and level. Revisit the aiming procedure outlined in the installation section; even a slight misalignment can cause significant glare for oncoming traffic. Remember, a proper beam pattern is a legal and safety requirement.
Overheating or Premature Failure
While LEDs run cooler than halogens, their drivers generate heat. If installed in a poorly ventilated space or with the dust cover sealed too tightly against the heat sink, heat buildup can shorten the LED’s lifespan. Ensure the dust cover extension provides adequate clearance. Never touch the LED heat sink with bare hands during installation, as oils can insulate heat. If an LED fails early, contact the manufacturer regarding warranty. Consistent overheating can also point to a voltage irregularity from the vehicle, which a multimeter can check.
Legal and Safety Regulations for Aftermarket LED Headlights
Upgrading your headlights isn’t just about brightness; it’s about compliance. Navigating the legal landscape is crucial to avoid fines and ensure you’re not creating a hazard for other road users.
DOT and SAE Compliance
In the United States, the Department of Transportation (DOT) and the Society of Automotive Engineers (SAE) set the standards for headlight performance. Legally, aftermarket headlights or conversion bulbs must be DOT/SAE compliant to be used on public roads. This compliance certifies that the light output, beam pattern, and durability meet federal safety standards. Look for “DOT” or “SAE” markings on the bulb or packaging. Be wary of inexpensive, non-compliant bulbs sold online that may produce excessive glare or incorrect patterns.
State-Specific Inspections and Laws
Beyond federal rules, individual states have their own vehicle codes and inspection requirements. Some states, like California, have strict regulations regarding aftermarket lighting. Even in states without annual inspections, law enforcement can issue citations for headlights that are too blue (typically exceeding a 6000K color temperature), cause excessive glare, or are not properly aimed. It is your responsibility as the vehicle owner to know and adhere to your state’s specific laws regarding headlight color, brightness, and modification.
The Importance of Proper Aiming
This cannot be overstated: a poorly aimed headlight is a dangerous and illegal headlight. Even compliant LED bulbs in the wrong housing or aimed too high will blind oncoming drivers. Proper aiming, as described in the installation guide, is a legal requirement in all 50 states. After any headlight replacement or suspension work, the aim should be checked. Many professional alignment shops offer this service for a nominal fee if you are unsure about doing it yourself.
Using LED Bulbs in Halogen Housings
A significant legal gray area involves placing LED replacement bulbs in headlight housings designed for halogen bulbs. While many do it successfully, the original halogen housing’s reflector and lens are not engineered for the different light source point of an LED. This can lead to non-compliant beam patterns and glare. The safest and most legally sound approach is to use a complete, DOT-approved LED headlight assembly. However, if using conversion bulbs, choosing ones specifically designed to mimic the halogen filament location and spending extra time on aiming is critical to approaching compliance.
Maintenance and Care for Your New LED Headlights
LED headlights are famously low-maintenance, but they are not “install and forget” components. A small amount of periodic care will maximize their performance and lifespan, keeping your 2011 Pilot shining brightly for years.
Regular Cleaning for Optimal Output
Dirt, road grime, and oxidation on the exterior lens can drastically reduce light output. Clean your headlight lenses regularly with automotive soap and water. For hazy or yellowed lenses (common on older Pilots), use a quality headlight restoration kit to polish the polycarbonate clear. After cleaning and restoration, apply a UV-protectant sealant to slow future oxidation. Remember to clean the back of the housing and the heat sink fins if accessible during other under-hood maintenance, as dust buildup can impede heat dissipation.
Periodic Connection and Seal Checks
Every six months or so, pop the hood and visually inspect your LED headlight installations. Check that all wiring connections are secure and that no wires are rubbing against sharp edges or hot components. Ensure the dust covers are still sealed firmly in place to prevent moisture ingress, which can damage the LED drivers and cause corrosion. A quick functional test of both low and high beams should be part of this routine check.
Heat Management and Ventilation
The longevity of an LED is directly tied to its operating temperature. Always ensure the area around the LED heat sink is clear of debris like leaves or nesting material. Avoid adding aftermarket covers or films that trap heat inside the housing. If you frequently drive in extremely hot climates, the added under-hood temperatures can stress electronic components; ensuring your vehicle’s cooling system is in top condition indirectly benefits your headlights.
What to Do in Case of Failure
Should an LED headlight fail, the modular design of most kits is an advantage. Typically, you will not need to replace the entire assembly. Identify which component failed—the bulb itself, the driver, or a connector. Most reputable manufacturers sell individual components or offer warranties. Because LEDs usually fail by dimming over time rather than burning out instantly, a noticeable decrease in brightness is your cue to investigate. Always replace LEDs in pairs to maintain consistent color temperature and output on both sides of the vehicle.
Summary of Key Points
Upgrading to LED headlights in your 2011 Honda Pilot is a transformative modification that enhances visibility, safety, and modernizes the vehicle’s look. The process begins with understanding the factory halogen system (H11 low beam, 9005 high beam) and recognizing the compelling advantages of LEDs: superior brightness and whiter light, significantly longer lifespan, reduced energy draw on the electrical system, and instant illumination.
Before purchasing, critical considerations include selecting the correct bulb size, prioritizing quality brands with robust heat sinks and drivers, understanding color temperature (5000K-6000K is ideal for visibility), and ensuring the kit includes necessary components like CANbus decoders and dust cover extensions for a seamless install.
The installation is straightforward but requires attention to detail: safely disconnect the battery, access the bulbs from behind the housing, secure the LED drivers, and crucially, re-seal the assembly and perform a professional-grade headlight aim on a level surface. Post-installation, be prepared to troubleshoot common issues like flickering (solved with decoders) or poor beam patterns (fixed by adjusting bulb orientation).
Legally, you must use DOT/SAE-compliant components and ensure your headlights are properly aimed to avoid blinding other drivers and violating state vehicle codes. Finally, maintaining your investment involves regular lens cleaning, periodic checks of seals and connections, and ensuring good heat management for maximum longevity. By following this comprehensive guide, you can confidently and safely enjoy the benefits of superior LED lighting on your Pilot.
الأسئلة الشائعة (FAQ)
Are LED headlights plug-and-play in a 2011 Honda Pilot?
Most quality LED kits are physically plug-and-play, meaning they connect to the factory harness. However, due to the Pilot’s electrical system, they are not functionally plug-and-play. You will almost certainly need the included CANbus decoders or an anti-flicker harness to prevent flickering and dashboard error messages. Modifying the dust cover is also a necessary step.
Will LED headlights damage my Pilot’s wiring or electrical system?
No. In fact, LED headlights draw less power (typically 20-30 watts per bulb) than the factory halogens (55 watts). This reduces the load on your vehicle’s electrical system and alternator. The key is using a properly designed kit with its own drivers to regulate voltage, not drawing excessive current.
How long do LED headlights typically last?
Quality LED headlights can last 30,000 to 50,000 hours or more, which often translates to the lifetime of the vehicle. This is vastly longer than halogen bulbs (1,000 hours) or even HIDs (10,000 hours). Lifespan is heavily dependent on heat management, so a good heat sink is critical.
Can I install LED bulbs in my fog lights as well?
Yes, the 2011 Pilot uses H11 bulbs for its fog lights, the same as the low beams. You can install an identical LED kit. Ensure they are aimed correctly (fog lights have a wide, low beam pattern) and check your local laws, as some jurisdictions have rules about fog light color.
Why are my new LED headlights not as bright as I expected?
Several factors could be at play. First, check the lumen rating; a higher number means more light. Second, a dirty or oxidized headlight lens can block a massive amount of light—clean or restore it. Third, improper bulb orientation creates a poor beam pattern, scattering light instead of projecting it down the road. Finally, ensure you purchased from a reputable brand, as some cheap LEDs have inflated output claims.
Is it worth getting a professional to install them?
If you are comfortable with basic car maintenance (changing a bulb, using hand tools), you can do this install yourself by following a detailed guide. The most technical aspects are modifying the dust cover and aiming the beams. If you are unsure about either of these, or troubleshooting potential electrical issues, having a professional installer or knowledgeable friend assist is a worthwhile investment to ensure safety and compliance.