
Imagine you are riding down a winding coastal road. The sun has set, and a heavy drizzle begins to blur your visor. Suddenly, you realize your stock halogen headlight is barely illuminating five feet in front of your front tire. This is not just uncomfortable; it is a life-threatening problem. For many riders, the search for motorcycle accessories begins not out of a desire for style, but out of a desperate need for safety.
Poor visibility is the silent killer in the motorcycling world. Whether it is the inability to see road debris or the failure of other drivers to see you, lighting is the single most critical factor in accident prevention. This guide addresses the “darkness problem” by introducing high-performance LED lighting as the ultimate solution, transforming your ride from a gamble into a calculated, safe experience.
The Problem: Why Stock Lighting Fails You
Most factory motorcycles, especially older models, come equipped with standard halogen bulbs. While cost-effective for manufacturers, these bulbs present significant issues for the end-user:
- Filament Fragility: Halogens rely on a delicate filament that breaks under the high vibration typical of motorcycling.
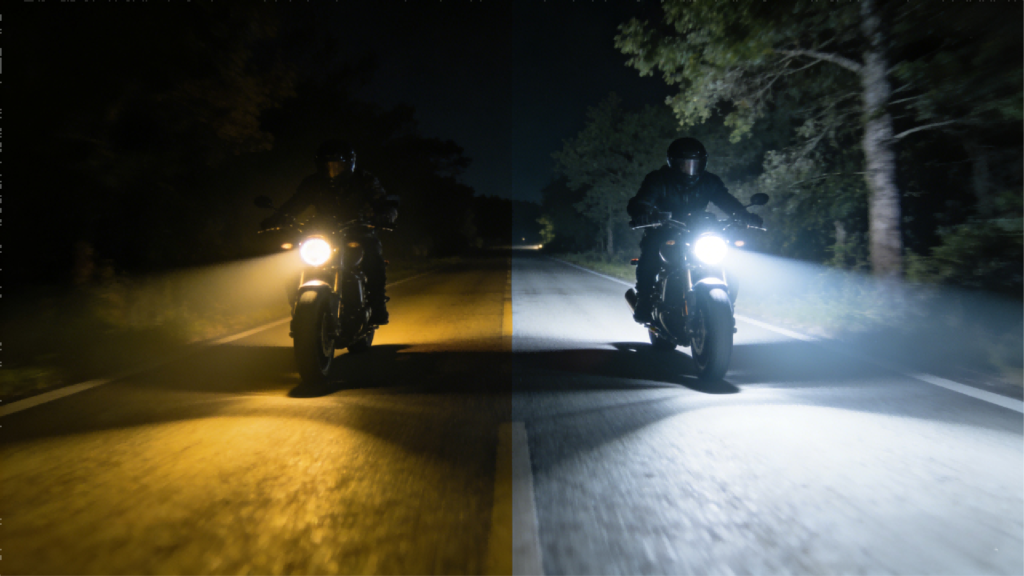
- Yellow Light Output: The 3200K color temperature can blend with streetlights, reducing contrast.
- Poor Spread: Stock reflectors often create a narrow “tunnel vision” beam, leaving the sides of the road (where deer or pedestrians lurk) in total darkness.
The Solution: Advanced LED Technology
The definitive solution to these visibility woes lies in upgrading your lighting ecosystem. Modern motorcycle accessories have evolved from simple aesthetic add-ons to sophisticated safety instruments. Specifically, Bi-LED projectors and auxiliary fog lights act as the antidote to night blindness.
Understanding the LED Advantage
Unlike halogens, Light Emitting Diodes (LEDs) are solid-state devices. They do not rely on burning filaments. Instead, they use semiconductors to convert electricity into light. This results in an instant-on capability—vital when you need to flash your high beams at a distracted driver. When you browse a premium motorcycle accessories shop, you are looking for lights that offer a Color Rendering Index (CRI) that mimics daylight, revealing hazards in high definition.
Module 2: Scenarios Where Solutions Matter
Different riding environments present unique “problems” that specific lighting setups can solve.
The Urban Commuter
In the city, the problem isn’t just seeing; it is being seen. The chaotic visual noise of city traffic means a single headlight often gets lost.
Solution: Installing auxiliary DRLs (Daytime Running Lights) creates a “triangle of light” (headlight + two aux lights). This geometric pattern allows human brains to judge your distance and speed much faster than a single point of light.
The Adventure Tourer
For the BMW GS or Africa Twin rider, the problem is the lack of ambient light in remote areas.
Solution: High-power spotlights. Brands like GTR offer long-throw laser or LED hybrids that can illuminate the trail up to 600 meters ahead, giving you ample reaction time at highway speeds.
Module 3: Critical Selection Factors for Your Solution
Not all LEDs resolve these issues equally. Low-quality parts may flicker or fail, reintroducing the danger. Here is how to choose the right tools.
| Factor | Why It Matters | The Ideal Spec |
|---|---|---|
| Ingress Protection (IP) | Moisture kills electronics. You ride in rain; your lights must survive it. | IP67 or IP68 (Submersible) |
| Beam Pattern | Blinding oncoming traffic is dangerous and illegal. | Sharp Cutoff Line (Z-pattern) |
| Thermal Management | Heat causes LEDs to dim (thermal throttle). | Copper PCB & Active Fan Cooling |
Module 4: Implementing the Solution (Installation)
Many riders hesitate to upgrade because they fear the wiring process. However, modern motorcycle accessories are designed with “Plug-and-Play” in mind.
For a standard headlight swap, the process typically involves removing the headlight bucket, unplugging the H4/H7 connector, and securing the new LED unit. For auxiliary lights, utilizing a dedicated wiring harness with a relay is crucial. This ensures your new powerful lights draw power directly from the battery, protecting your factory wiring harness from overheating.
Module 6: Why GTR is the Safety Partner You Need
When your safety hangs in the balance, the brand you choose matters. GTR is not just another generic supplier; we are optical engineers. Our products found on ledcxr.com undergo rigorous photometric testing.
We solve the “glare problem” by precision-aligning our LED chips to match the focal point of classic reflectors. Furthermore, GTR acknowledges the harsh reality of motorcycle vibrations. Our drivers are potted (encased in resin) to prevent internal components from shaking loose, a common failure point in cheaper alternatives. Choosing GTR means choosing a verified solution to the visibility problem.
Module 5: Frequently Asked Questions (FAQ)
Q1: Will upgrading my lights drain my motorcycle battery?
Generally, no. LEDs are far more efficient than halogens. A standard halogen draws 55W, whereas a brighter LED might only draw 25W-30W. This actually reduces the strain on your stator and rectifier.
Q2: Are these upgrades legal for street use?
This depends on your local regulations. However, products that feature a clear “cutoff line” (preventing light from shining high into oncoming eyes) are generally compliant. Always check if the specific motorcycle accessories brand carries DOT or ECE certification.
Q3: What color temperature is best for rain?
White light (6000K) is great for clear nights, but yellow light (3000K) is superior for rain and fog. Yellow light has a longer wavelength and penetrates moisture better with less reflection/glare back at the rider.
Q4: Can I install these on a vintage bike with an AC electrical system?
You must be careful here. Most LEDs require DC power. If you have an old 2-stroke enduro bike running AC, you may need a rectifier/regulator upgrade before installing modern DC motorcycle accessories.
Q5: How do I aim my new lights?
Park your bike 25 feet away from a wall on level ground. The top of the low beam cutoff should be about 2 inches lower than the height of the center of your headlight lens.