Introduction: The Essential Guide to Spa Light Replacement Bulbs
A flickering or completely dark spa light can instantly dim the ambiance of your backyard oasis. While it might seem like a minor component, the right lighting is crucial for safety, setting the mood, and extending your enjoyment into the evening hours. Replacing a burnt-out bulb is one of the most common and manageable spa maintenance tasks, but navigating the world of voltages, bulb types, and technologies can be confusing. This essential guide is designed to demystify the process. We’ll walk you through everything from identifying your existing bulb and understanding the key specifications to a safe, step-by-step replacement procedure. Whether you’re restoring a simple white glow or upgrading to a dazzling color show, having the correct spa light replacement bulb and knowledge ensures your hot tub remains a luminous retreat.
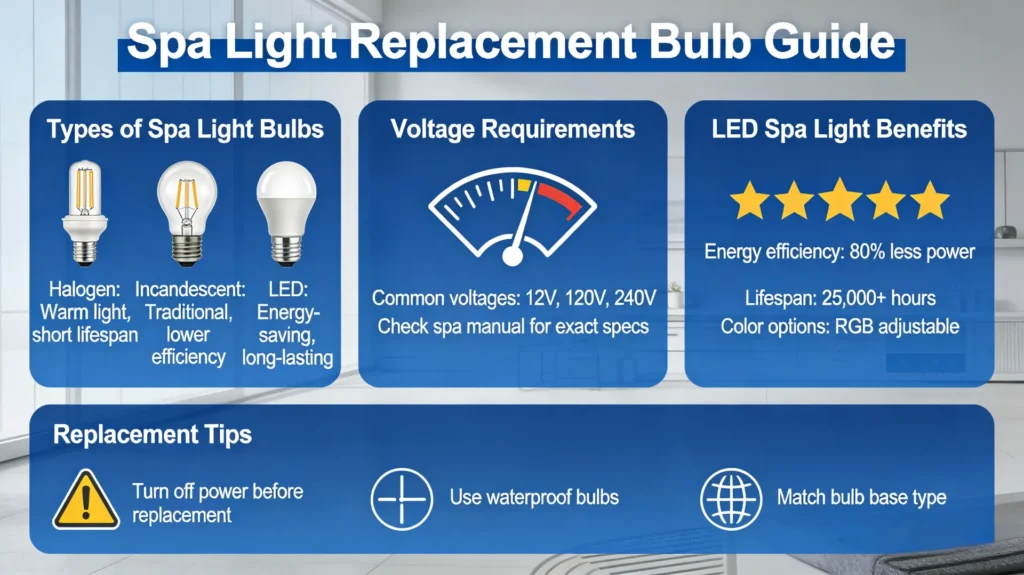
Understanding Spa Light Bulbs: Types, Voltages, and Technologies
Not all light bulbs are created equal, and this is especially true for the wet, demanding environment of a spa. Choosing the right replacement starts with understanding three core concepts: the bulb technology, its voltage, and its physical base.
Bulb Technologies: Halogen vs. LED
For years, halogen bulbs were the standard in spa lighting. They produce a bright, warm light but operate at high temperatures and are less energy-efficient. Their primary drawback is a shorter lifespan, often needing replacement every 1-3 years. Today, LED (Light Emitting Diode) technology has become the dominant choice for new installations and upgrades. LED spa bulbs run cool, use a fraction of the energy, and boast lifespans measured in decades of normal use. They are also the gateway to advanced features like multi-color displays and remote control.
Voltage: The Critical Safety Specification
This is the most important factor to get right. Spa lights operate on either 12V or 120V. A 12V system uses a transformer to step down the household current to a much safer, low-voltage power for the light fixture. A 120V system runs line voltage directly to the fixture. You must match the voltage of your replacement bulb to your spa’s system. Installing a 12V bulb in a 120V socket will instantly destroy it, while putting a 120V bulb in a 12V system simply won’t work. You can typically find this information on the face of the old bulb, in your spa’s manual, or on the fixture itself.
Base Types and Sizes
The base is the part of the bulb that screws or plugs into the socket. The most common base for spa bulbs is the standard E26 (medium) screw base, identical to many household lamps. Some spas, particularly older models or specific brands, may use a different base like a bi-pin plug. Physical size also matters. Spa light niches come in standard diameters, often referred to as “small spa size” (typically around 3-4 inches) or larger pool-size fixtures. An upgrade kit must match the size of your existing fixture’s opening.
Key Factors to Consider When Choosing a Replacement Spa Light Bulb
With the basics understood, you can now make an informed purchasing decision. Beyond just voltage and base, several other factors will determine your satisfaction with the new light.
- التوافق: Always cross-reference the part number from your old bulb or your spa’s manual. Manufacturer-specific parts, like those for Master Spa models (e.g., for the 2012 Contractor Series CS 360/415), ensure a perfect fit. Generic replacements must match all technical specs.
- Brightness and Color Temperature: For white LED bulbs, brightness is measured in lumens, not watts. A 12W LED can be very bright. Color temperature, measured in Kelvins (K), defines the light’s hue—warm white (2700K-3000K) for a cozy glow, or cool white (4000K-5000K) for a brighter, more daylight-like effect.
- Single-Color vs. Multi-Color: Decide if you want a fixed white light or the dynamic effects of an RGB (Red, Green, Blue) LED bulb. RGB bulbs use a remote to cycle through colors and patterns, transforming your spa’s ambiance.
- Quality and Warranty: Opt for bulbs designed for aquatic environments, featuring proper sealing and corrosion-resistant materials. A reputable brand with a solid warranty is a good indicator of durability.
- Price Point: Prices vary widely. Simple 12V halogen replacements can be very affordable (e.g., a 2-pack for $3.95), while advanced 16-color LED upgrade kits can cost around $100. Consider the long-term value of an energy-efficient, long-lasting LED versus a cheaper, shorter-lived halogen.
Step-by-Step Guide: How to Replace Your Spa or Hot Tub Light Bulb
Replacing a spa light bulb is a straightforward DIY task if done carefully. Always prioritize safety by starting at the electrical panel.
- Disconnect ALL Power: Go to your home’s main circuit breaker panel and turn OFF the breaker that supplies power to your spa. Do not rely on the spa’s topside controls alone. For added safety, use a voltage tester at the spa’s pack to confirm power is off.
- Locate and Access the Light Fixture: The light is housed behind a lens (or “fixture face”) secured by a single screw or a locking ring. This is usually accessible from inside the spa shell. Remove the screw or unscrew the ring by hand or with a wrench.
- Remove the Fixture Assembly: Carefully pull the entire light fixture assembly a few inches out of the spa wall. There will be enough slack in the cord to rest it on the spa ledge. Never pull on the cord itself.
- Open the Housing and Replace the Bulb: On the back of the fixture, you’ll find a compartment sealed with a large O-ring. Unscrew the housing or release the clips to access the bulb. Remove the old bulb (let it cool if halogen) and insert the new one, taking care not to touch a halogen bulb’s glass with bare fingers. Ensure any gaskets or O-rings are clean and properly seated before resealing the housing tightly.
- Reinstall and Test: Gently push the fixture back into its niche, ensuring the cord is not pinched. Re-secure the lens or locking ring. Restore power at the breaker and test the new light using the spa’s control system.
Troubleshooting Common Spa Light Issues Before You Replace
If your spa light isn’t working, a burnt-out bulb is only one possible cause. Running through these checks can save you time and money.
- Check the Obvious: First, ensure the spa has power and isn’t in a “sleep” or economy mode where lights are disabled. Verify the light function is activated on the topside control panel.
- Inspect the Circuit Breaker and GFCI: A tripped breaker or GFCI (Ground Fault Circuit Interrupter) outlet is a common culprit. Reset them and test again.
- Examine the Transformer: For 12V systems, a failing transformer can stop the lights. If it feels excessively hot or has a burnt smell, it may need replacement.
- Look for Loose Connections or Corrosion: Once power is safely disconnected, inspect the bulb socket and wiring connections in the light fixture and at the spa pack for corrosion, looseness, or damage.
- Test the Bulb: If possible, test the suspected bad bulb in a known-working fixture (with correct voltage) or use a multimeter to check for continuity. A broken filament in a halogen bulb is often visible.
- Consider the Controller: For LED systems, a faulty LED controller (the small box that manages color functions) can be the issue. If the light has power but won’t change colors or turn on, the controller may be at fault.
Exploring Advanced Options: RGB, Multi-Color, and Smart LED Spa Bulbs
Upgrading to a color-changing LED system can completely revitalize your spa experience. These are no longer just for commercial pools; affordable retrofit kits make them accessible for any homeowner.
RGB and Multi-Color Bulbs: An RGB LED bulb contains three diodes (Red, Green, Blue) that mix to create a spectrum of colors. Kits like the PoolTone™ 16 Color LED Upgrade Kit or the COOLWEST 120V LED Spa Light with Remote allow you to cycle through preset colors—from calming blues and purples to vibrant reds and greens—and often include modes like color fading, strobe, or jump. They typically come with a waterproof remote control for easy operation from inside the spa.
Smart Integration: The frontier of spa lighting involves Wi-Fi or Bluetooth-enabled smart bulbs. These can be integrated into your home automation system (like Alexa or Google Home) or controlled via a smartphone app. Imagine scheduling your spa lights to turn on at dusk or changing the color with a voice command.
Retrofit Kits: These kits are designed to replace your existing halogen or single-color LED system without replacing the entire fixture. They include the special LED bulb, a color controller, and often a new lens. It’s crucial to select a kit that matches your spa’s voltage and fixture size (e.g., “Small Spa Size”). When installed, they provide a modern, energy-efficient lighting system with all the benefits of color-changing technology, offering a high-impact upgrade for your spa light replacement bulb project.
Top Brands and Product Recommendations for Spa Light Bulbs
Selecting a reliable brand is a smart way to ensure you get a quality product that fits correctly and lasts. The market offers a mix of original equipment manufacturer (OEM) parts and high-quality aftermarket alternatives. For critical components, especially in complex lighting systems, OEM parts from your spa’s manufacturer guarantee a perfect fit and function. However, for standard bulb replacements, several reputable aftermarket brands provide excellent performance and innovative features.
Trusted Brands in Spa Lighting
Master Spa Parts is the definitive source for OEM lighting components for Master Spas, Twilight Series, Michael Phelps, and other models under their umbrella. They offer everything from specific spa light replacement bulb units (like the $3.62 bulb for 2012 Contractor Series models) to complete light assemblies, harnesses, and controllers. Purchasing from them ensures compatibility and preserves your warranty. Pentair is a giant in the pool and spa industry, known for their Amerlite and SpaBrite fixtures. Their PoolTone™ line offers upgrade kits specifically designed to retrofit their older fixtures with modern, multi-color LED technology. COOLWEST represents a popular category of aftermarket, feature-rich LED bulbs. Their products, like the 120V RGB bulb with a remote, are known for bringing advanced color-changing capabilities to standard E26 socket fixtures at a competitive price point.
Product Recommendations for Different Needs
Here are specific product types to consider based on common replacement scenarios:
- Basic, Budget-Friendly 12V Halogen Replacement: Look for value packs like the “Spa Light Bulb 12V Replacement 2-Pack” found for under $4 per bulb. These are perfect for straightforward swaps in spas that use simple, warm-white halogen bulbs and where color-changing features aren’t a priority.
- Standard Socket RGB Upgrade (120V): إن COOLWEST 120V LED Spa Light Bulb (12W, E26 Base) is a top contender. It directly replaces old incandescent or halogen bulbs in standard medium-base sockets, adding 16+ colors and multiple dynamic modes via an included remote. It’s a plug-and-play solution for a dramatic ambiance upgrade.
- OEM-Specific Bulb Replacement: Always check your spa’s manual or parts list. For example, Master Spa owners can find the exact replacement bulb (SKU: X802850) for specific series. Using the correct OEM bulb avoids potential issues with fit, seal, or electrical compatibility.
- High-End Retrofit Kit for Pentair/SpaBrite Spas: إن PoolTone™ 16 Color LED Upgrade Kit for Small Spa Size fixtures. Priced around $99.99, this kit is designed to professionally upgrade older Pentair color-changing spa lights to a modern, reliable, and vibrant LED system without replacing the entire niche.
- Complete Light Assembly: When the fixture itself is cracked or damaged, you’ll need more than a bulb. Brands like Master Spa Parts offer complete 3-inch or 5-inch light assemblies (e.g., SKU: X259200 or X259255) that include the housing, lens, and bulb as a sealed unit, simplifying the repair.
When choosing, always cross-reference the product specifications with your spa’s requirements—voltage (12V vs. 120V), base type (E26, screw terminal, bi-pin), and fixture size are non-negotiable details for a successful installation.
Maintenance Tips to Extend the Life of Your Spa Lighting
Proper maintenance goes beyond just changing the bulb when it burns out. Proactive care can significantly extend the lifespan of your spa lights, prevent premature failures, and keep them shining brightly for years.
Regular Inspection and Cleaning
Make it a habit to visually inspect your spa light during routine water care. Look for any hairline cracks in the lens, cloudiness, or mineral deposits. A compromised lens seal allows water ingress, which is the leading cause of bulb and fixture failure. Gently clean the lens with a soft cloth and a non-abrasive, spa-safe cleaner to remove biofilm, calcium scale, or grease. Avoid harsh chemicals or scrubbing pads that can scratch the acrylic, as scratches can become weak points and diminish light output.
Water Chemistry Balance is Paramount
This is the most critical factor for longevity. Imbalanced water is corrosive and accelerates the deterioration of every metal and electrical component in your spa, including the light fixture’s housing, screws, and socket.
- pH Level: Keep your pH firmly between 7.2 and 7.8. Low pH (acidic water) aggressively attacks metal parts and can etch the lens. High pH leads to scale formation that can crust over the light and trap heat.
- Sanitizer Levels: Maintain consistent sanitizer levels (chlorine or bromine). Wild swings from very high to zero sanitizer cause stress on plastics and metals. Avoid directly pouring concentrated chemicals near the light niche.
- Total Alkalinity: Proper TA (80-120 ppm) acts as a buffer to stabilize pH, preventing the rapid fluctuations that damage equipment.
Well-balanced water prevents galvanic corrosion, scaling, and plastic degradation, creating a safe environment for your lighting system.
Operational Best Practices
How you use the lights also affects their lifespan. Avoid leaving spa lights on for excessively long periods when the spa is not in use, as this generates continuous heat and uses energy unnecessarily. For LED bulbs, this is less of a concern for burnout but still consumes power. If your spa has a dedicated light circuit or a separate switch, turn the light off when the spa is covered and not in use. During the winter, if you are winterizing your spa, ensure the light fixture is dry and the compartment is sealed to prevent moisture accumulation during freezing temperatures.
Prevent Physical Damage
Be mindful of the light when placing or moving objects in the spa. Avoid banging hard toys, cleaning tools, or other objects against the lens. During draining and refilling, do not direct a high-pressure hose stream directly at the light fixture. When replacing the bulb or accessing the fixture, always handle the lens and gasket with care to avoid pinching or tearing the seal, which is its primary defense against water.
Safety First: Crucial Precautions for Spa Light Replacement
Working with electricity and water is an inherently dangerous combination. Ignoring safety protocols can lead to severe electrical shock, equipment damage, or personal injury. Adhering to these precautions is non-negotiable.
Power Disconnection: The Absolute First Step
This cannot be overstated. Before you touch anything, you must completely disconnect all power to the spa.
- Turn Off the Spa’s Power at the Main Service Panel (Breaker Box): Locate the dedicated circuit breaker for your spa and switch it to the OFF position.
- Lock Out/Tag Out (If Possible): Use a breaker lock or place a prominent tag on the panel to prevent someone from accidentally turning the power back on while you are working.
- Verify Power is Off: Use a non-contact voltage tester at the spa’s control panel and near the light fixture to double-check that no power is present. Do not rely solely on the breaker switch.
Never assume the light switch or the spa’s topside controls are sufficient isolation. You must interrupt power at the source.
Handling and Installation Safety
Once power is confirmed off, proceed with caution. Always allow the old bulb and fixture to cool completely before handling to avoid burns. When installing the new bulb, handle it with a clean, dry cloth or gloves. Oils from your skin can create hot spots on halogen bulbs, shortening their life, and can corrode the base of any bulb over time. Do not overtighten the bulb or the lens retaining ring. Follow the manufacturer’s instructions for torque—snug is usually enough. Overtightening can crack the lens, strip threads, or distort the crucial sealing gasket, leading to a leak.
Gasket and Seal Integrity
The gasket (O-ring) is what keeps water out of the electrical components. Every time you open the light fixture, inspect this gasket meticulously. Look for any signs of cracking, brittleness, flattening, or tears. Even a tiny defect can allow moisture to seep in. It is a best practice to replace the lens gasket every time you open the fixture. A new gasket is a cheap insurance policy against a costly water-damaged fixture or a short circuit. Before reassembly, clean the gasket channel on the fixture and the lens, and lightly lubricate the new gasket with a pure silicone lubricant designed for spa seals to ensure a proper, pliable seal.
Know Your Limits and When to Call a Professional
If at any point you encounter wiring that looks corroded, frayed, or burned, stop immediately. If the light niche inside the spa shell is cracked or damaged, the repair is beyond a simple bulb swap. If you are uncomfortable with any step of the process, from identifying the correct part to handling the wiring, call a licensed electrician or a qualified spa technician. The cost of a professional service call is far less than the cost of repairing water damage from a failed installation or, far worse, dealing with the consequences of an electrical accident.
ملخص النقاط الرئيسية
Replacing your spa light is a manageable project that can refresh your spa’s ambiance and functionality. The key to success lies in informed preparation and strict adherence to safety. First, accurately identify your existing bulb’s type, voltage, and base by consulting your manual or inspecting the old bulb. Understand the trade-offs between halogen’s warm glow and LED’s efficiency and color options. When selecting a replacement, prioritize compatibility above all, then consider desired features like multi-color effects or smart controls from reputable brands, whether OEM or trusted aftermarket.
The replacement process itself is straightforward if you follow a methodical guide: disconnect all power, safely access the fixture, carefully replace the bulb and critical sealing gasket, and reassemble. Proactive maintenance, primarily through impeccable water chemistry balance and regular visual inspections, will maximize the lifespan of your new light. Finally, never compromise on safety. Always disconnect power at the breaker, verify it’s off, and respect the dangers of mixing electricity and water. By following this comprehensive guide, you can ensure your spa remains a safely and beautifully illuminated retreat.
الأسئلة الشائعة (FAQ)
How do I know if my spa light is 12V or 120V?
The most reliable ways are to check your spa owner’s manual or look at the label on the back of the light fixture housing (once you safely access it). If that’s not possible, examine the old bulb. Many 12V spa bulbs are smaller and have two pin bases (like a bi-pin), while 120V bulbs often use a standard medium (E26) screw base. You can also check if your spa has a transformer; if it does, the light is almost certainly low-voltage (12V). Never guess, as installing the wrong voltage bulb can lead to immediate failure or a safety hazard.
Can I replace my halogen spa light with an LED bulb?
In most cases, yes, and it’s a highly recommended upgrade. You must ensure the LED replacement bulb matches the voltage (12V or 120V) and base type of your existing halogen bulb. Swapping to an LED will reduce energy use, generate less heat, and typically offer a much longer lifespan. For color-changing effects, you may need a specific RGB LED bulb and possibly a compatible controller, which are often sold as retrofit kits designed for this purpose.
Why did my new spa light bulb burn out immediately?
An immediate failure usually points to a few possible issues: 1) Incorrect Voltage: Installing a 12V bulb in a 120V fixture will cause it to blow instantly. 2) Poor Connection: A loose or corroded socket can cause arcing and burnout. 3) Moisture in the Fixture: If water has leaked into the socket, it will short the bulb out. 4) Faulty Transformer (for 12V systems): A failing transformer can send a voltage spike. Investigate these areas before installing another bulb.
My spa light flickers. Does this mean the bulb needs replacement?
Not necessarily. While a failing bulb can flicker, it’s often a symptom of another problem. Check for a loose bulb in the socket first. If it’s secure, the issue could be a loose wire connection, a failing transformer (for 12V lights), or a problem with the control system or dimmer. For LED lights, flickering can sometimes indicate an incompatibility with an old-style transformer designed for halogen bulbs.
Is it safe to change a spa light bulb with water in the tub?
Technically, yes, because the light fixture is designed to be removed and serviced from the dry side (outside the spa shell) without draining. The critical safety factor is absolute power disconnection at the breaker, not the water level. However, if you are accessing a fixture that is located in a wet compartment or if you have any concern about leaks, draining the spa below the light level can provide an extra margin of safety and peace of mind.
How often should I replace the lens gasket on my spa light?
You should inspect it every time you open the fixture to replace a bulb. Given its vital role in preventing leaks, the best practice is to replace the lens gasket annually as preventative maintenance or during every bulb change, whichever comes first. Gaskets degrade over time due to heat, chemicals, and compression, so a fresh, pliable gasket is the cheapest and most effective way to prevent water damage.